
So maybe you already got a coiled cable, or still considering one, in any case this short tutorial willl give you some tips about handling and taking care of your custom USB wire.
Our experience has tought us a thing or two about custom USB wires. I'll try to make this read short and informative.
First thing first. If you are not familiar with the different elements of your keyboard cable. You can read more in our FAQ. If you are new to our hobby, this will be helpful.
Please follow this assembling order:
Step 1: After unwrapping your wire, start by plugging your device end to your mechanical keyboard. Probably that's USB C, but it also might be USB Mini or Micro.
Step 2: Connect your host cable to your PC.
Step 3: Connect the 2 parts of your detachable connector. Gx16 and Gx12 should be screwed in with the little ring. Our Yc8, Lemo-like and Mini XLR are push-pull. Just find the right spot and you will get the click.
That's it! There aren't many issues there, but here comes a possible few:
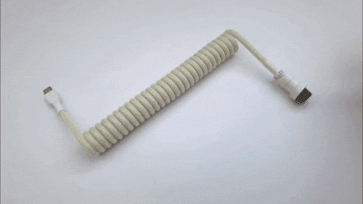
Issue 1: If you have opted for a coiled cable with Direction 5 or 4 (connector facing backwards), you might get a twisted coil like in the photo below.

The host cable is applying pressure on your coil, hence the twisted look. You just need to unplug the host cable (PC end) and rotate it around itself in the proper direction. With a few twists you can get from this to this -

Issue 2: The coil seems a bit loose. That could happen for a few reasons:
- If the coil has been stretched beyond it's abilities. Keep in mind the coil is just for aesthetic purpose. Don't stretch it and it will last very long time.
- With Direction 4 or 5 you can grab the detachable connector, before connecting it the the host half, and rotate it clockwise.Don't overdo it, because the coils won't look as even.
Finally, a few tips about taking care of your cable.
Tip 1: Keep your USB C straight. That includes the cable from the last coil to your USB C connector. Do not bend it as it will apply constant pressure over the soldering points.

Tip 2: If your cable connector is painted, keep it on a soft ground like desk pad or something of a sort. Constantly moving it on your abrasive desk will cause little scratches over time.
Tip 3: For Gx16 and Gx12. When you are unpluggin the connector, don't grab over the screwing ring and push backwards. The screwing ring is pretty sharp from the inside and pressuring it towards the body of your connector may harm the surface of the paint.
Tip 4: The coil is springy, but don't stretch it. If you overstretch it, the coil might loose its shape and consistency.
Tip 5: And finally! Keep your dogge away from your board if possble. They may see your cable as a chewing toy. :D

P.s This still works by the way :)!
And that's pretty much all! If you still struggle setting up your coiled cable, don't hesitate to message us. We'll be happy to help :)!
Author:
Ivailo K.